[PART #1] – [PART #2] – [PART #4]
Welcome to the third and final part of our short ebook creation guide. After going on and on about the importance of styles, today I’ll finally show you how to get your ebook converted to MOBI or EPUB, files that you can easily upload to the Amazon ebook store, B&N etc.
2 Free Tools You Need To Download
There are many tools with which you can create ebook files and preview how they appear on various devices. Here are my two favorites, and yes, they’re both free:
Calibre – the ultimate ebook conversion, organization and management suite
Kindle Previewer – little tool to preview your finished ebook on various Kindle devices
Step 1: Saving Your Ebook As HTML
Although Calibre accepts ODT (openoffice format), I have had better results with saving my books in OpenOffice first as .HTML.

Go to File > Save As

From the Save as type drop-down menu select HTML
2. Loading Your Ebook Into Calibre

Launch Calibre. To add a new book click on the red book icon or Add Book

In the dialogue, navigate to the location of your HTML file, select it, click Open.

Wait a second while Calibre pulls the file into its database…

There it is! In the next step, click on the blue icon Edit Metadata to add some more information.
3. Adding A Cover and Author Information

Here we can add/change all kinds of things. For now, pay attention to two things: The cover & author information.
As usual, Calibre messed up my name, turning the é into a ?, also we should add a cover. The cover can be changed by clicking on Browse in the Change cover section. The author field can be edited by selecting it.

I’ve quickly done that. Also note that in the upper hand corner, we see all the various formats associated with this publication. Right now it exists only in ZIP (Calibre converted the HTML to zip), but this is soon to change… When you’re done with adding/changing metadata click OK.
4. Convert Your Ebook For Amazon Kindle

To convert our book, click on the third icon from the left Convert Books, and you’ll see this:

This is the conversion window. Calibre provides us with tons of option for getting the best results. In the beginning you won’t need most of these settings. Here are some essential things to look for:

In the upper right corner, select the OUTPUT format, for example, if you want to create a MOBI for Amazon Kindle, select MOBI.
Next, let’s take a look at the Look & Feel panel:
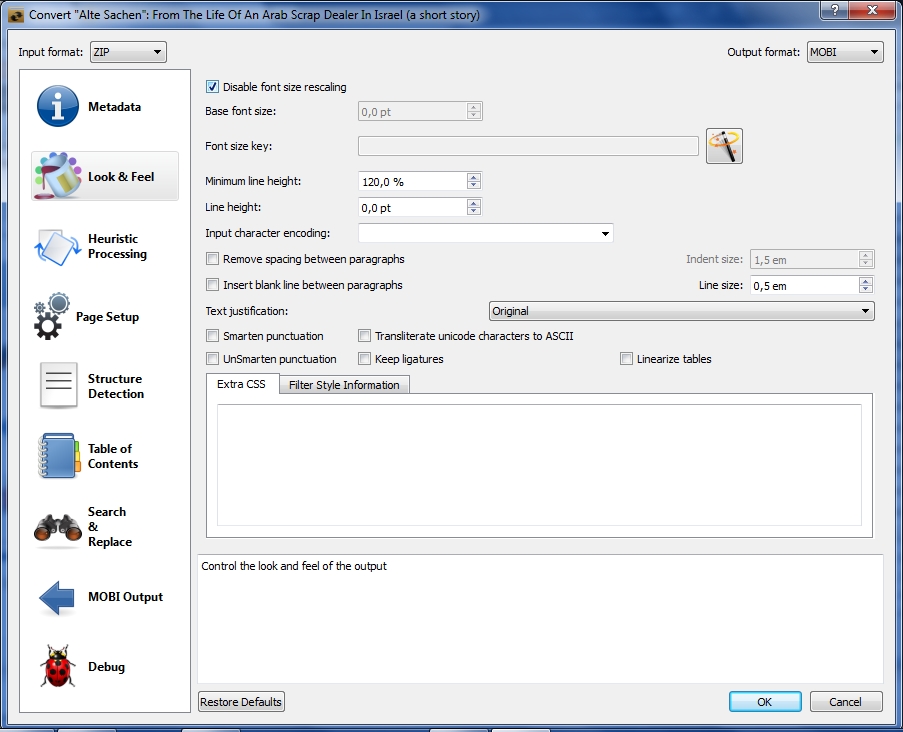
Some things you might want to check here are:
Disable Font Size Rescaling: prevents Calibre from using the same font-size for all your paragraphs (headings not affected)
Remove Spacing Between Paragraphs: This will remove “empty lines” and put all your paragraphs together, allowing you to set an indent:


Another interesting setting is Smart Quotes which converts all your quotes:

Now, let’s take a look at the Structure Detection panel:

Calibre will automatically try to detect chapters and insert pagebreaks (before Heading 1 and 2 styles! ) If you’d also like to have these breaks before Heading 3 you could change the line:
//*[name()=’h1′ or name()=’h2′]
to something like:
//*[name()=’h1′ or name()=’h2′ or name()=’h2′]
Or maybe you’d like to have breaks only before Heading 1 styles?
Change the code to:
//*[name()=’h1]
Simple, isn’t it?
Next, let’s take a look at our Table Of Contents panel:

By default, Calibre will not generate an automatic Table Of Contents. You have to tick “Force use of auto-generate Table Of Contents”
And now, let’s do some magic with our styles again. We can easily set the levels (hierarchy) of our Table Of Contents to our styles:

This sets Heading 1 to Level 1 in my Table Of Contents, for example.

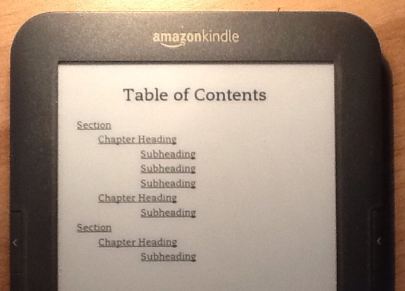
Now I’ve set Level 2 and 3 to Heading style 2 and 3, respectively, which will produce a three-level TOC like you’ve seen in our last tutorial:
Once you’re done with your Conversion Settings, click OK.

In the lower right corner of your calibre window you’ll see the Job of converting your ebook. Note, that as long as the book isn’t converted, the only Format you’ll see is ZIP.

Once it’s done, it’ll say 0 next to Jobs, and you’ll see MOBI under formats.
To preview your finished file, click on Click to Open, which will show you the directory of this ebook.
5. Previewing Your Ebook
If you have installed the Kindle Previewer you can now open the MOBI file and check if everything is alright:

Looking good? Great! Now you can upload your MOBI to the Kindle store.
P.S.: The above process is exactly the same when you’re converting to EPUB.
— END OF PART #3 —
This was the last part of our tutorial series. There is of course much more to say, so if you’d like to know more, I’d recommend the following: Ask your question in the comments section below, and if there’s a demand for more, I’ll collect all your questions and make another Q&A post.
UPDATE: There is another tutorial in this series about creating a rudimentary cover. Read part #4 here
—
Was this tutorial helpful? Did I miss something? What do you think? Leave a comment!
–